 On this page you can learn:
How to Create a Source Reference
How to Edit a Source Reference
How to Delete and Undelete Source References
You can also watch a video tutorial on:
Citing Works of Art, Photographs, and Images in NoodleTools
You'll also find more specific help on citation styles (MLA, APA, Chicago/Turabian) here:
1. Click Sources in the navigation bar at the top of the screen to begin adding references to a new project.
2. Click Create new citation.

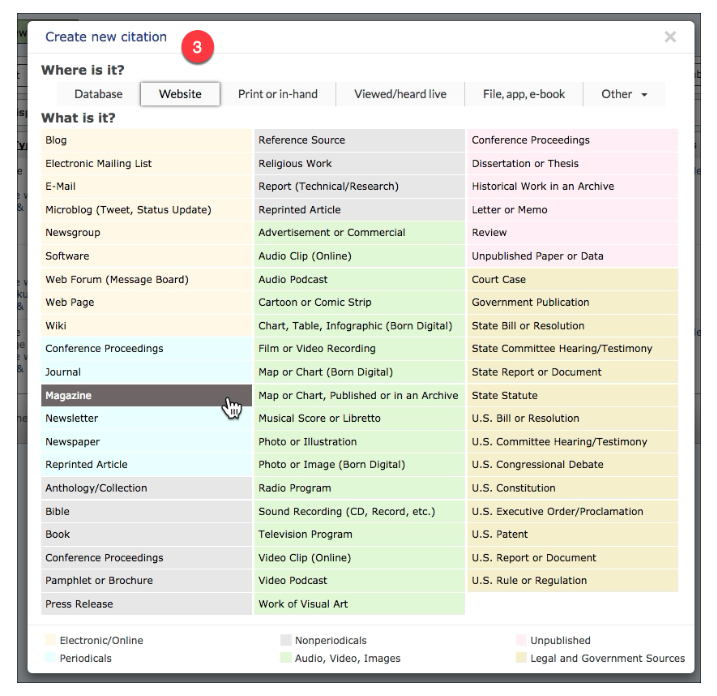
3. When you create a new citation, you will be prompted to select where the source is and what type it is. The content of the list will vary depending on what project level you selected. The example shown below is using the Advanced level.

Once you select what the source is, a new citation form will appear in the next screen.

Note: If you have selected in your profile to display "Show Me" help screens when available, a help screen will appear first.
The form that you will complete to cite a source is dynamic and shows you only the fields that apply to your specific source. Those fields change based on the style (MLA, APA, or Chicago), level (Starter, Junior or Advanced), source type, content type, and publication medium selected.

5. A Guide at the top-right of the screen displays a formatting template. Click the blue tab (APA Guide in the screenshot below) to open the guide. As you enter information in the form, the corresponding element is highlighted in the template.
4. On the form, fill in as many details about your source as possible. Help text pops up with tips as you move from field to field.

6. On the form, any field that has a red * is required. If the field has no data, you will not be able to submit the form. Note that other fields are also necessary to create the reference properly, but there are cases when those non-starred fields might need to be left empty.
7. As you type into a field, NoodleTools automatically checks for common errors with capitalization, abbreviations, and more. When a yellow warning triangle appears to the right of a field, mouse-over the triangle to view suggestions for how to correct the potential problem.

8. An Annotation field at the bottom of every form allows you to create an annotated bibliography (you can later choose to include or exclude the annotations from your exported source list via the Print Formatting option).

9. Below the Annotation field, the checkbox next to Include this source in my final bibliography (checked by default) allows you to add a source to your working bibliography but then omit it from your final exported version. The traffic light image (red, yellow, or green) next to the checkbox will indicate whether or not a particular source is typically included for the citation style you are using.For example, a well-known reference book is not usually included in a Chicago-style bibliography (but would be in MLA or APA source lists).
10. Submit the form to add your reference to your source list.
11. If there are multiple references in your source list, a link Jump to citation I just edited at the top of your bibliography takes you to the one you just added (which will also be highlighted in your list).
12. Repeat all steps above for each source you wish to cite.
1. Find the source reference you wish to edit and select Edit on the Options menu.

2. Modify the information about your source. You can either:
3. Check for any new data required if you have updated the publication medium or source/content type.
4. Click Submit.
5. If there are multiple references in your source list, a link Jump to citation I just edited at the top of your bibliography takes you to the one you just added (which will also be highlighted in your list).
Deleting a reference from your source list:

Deleting multiple references at once:
Undeleting references:
NOTE: Notecards become unlinked from a source when the reference is deleted (they become “thought cards”). If you restore a reference, you will need to relink its notecards (either by editing each notecard and selecting the right item from the Source menu or by selecting multiple notecards on the Notecard Tabletop and clicking Link to source to relink all of them).
Watch this tutorial (11:42) to learn how to use NoodleTools to cite images in art: photographs or illustrations, "born digital" images like logos or graphics, or works of visual art.
Tutorial created by Susan Timmons, Upper School Librarian, The Harpeth Hall School, Ann Scott Carell Library, Nashville, Tennessee, September 5, 2018, using Screencast-O-Matic.
The librarian is always happy to help you!
 In Person - during library hours,
6:30 a.m. - 2:45 p.m., Monday - Friday
 Or Sign Up for Connections (before 8:30AM daily)
 240-236-8616 - during library hours
 By Email - charlotte.thompson@fcps.org